| Version 8 (modified by , 8 years ago) ( diff ) |
|---|
How-To use VisIt on JURECA
Hardware Setup
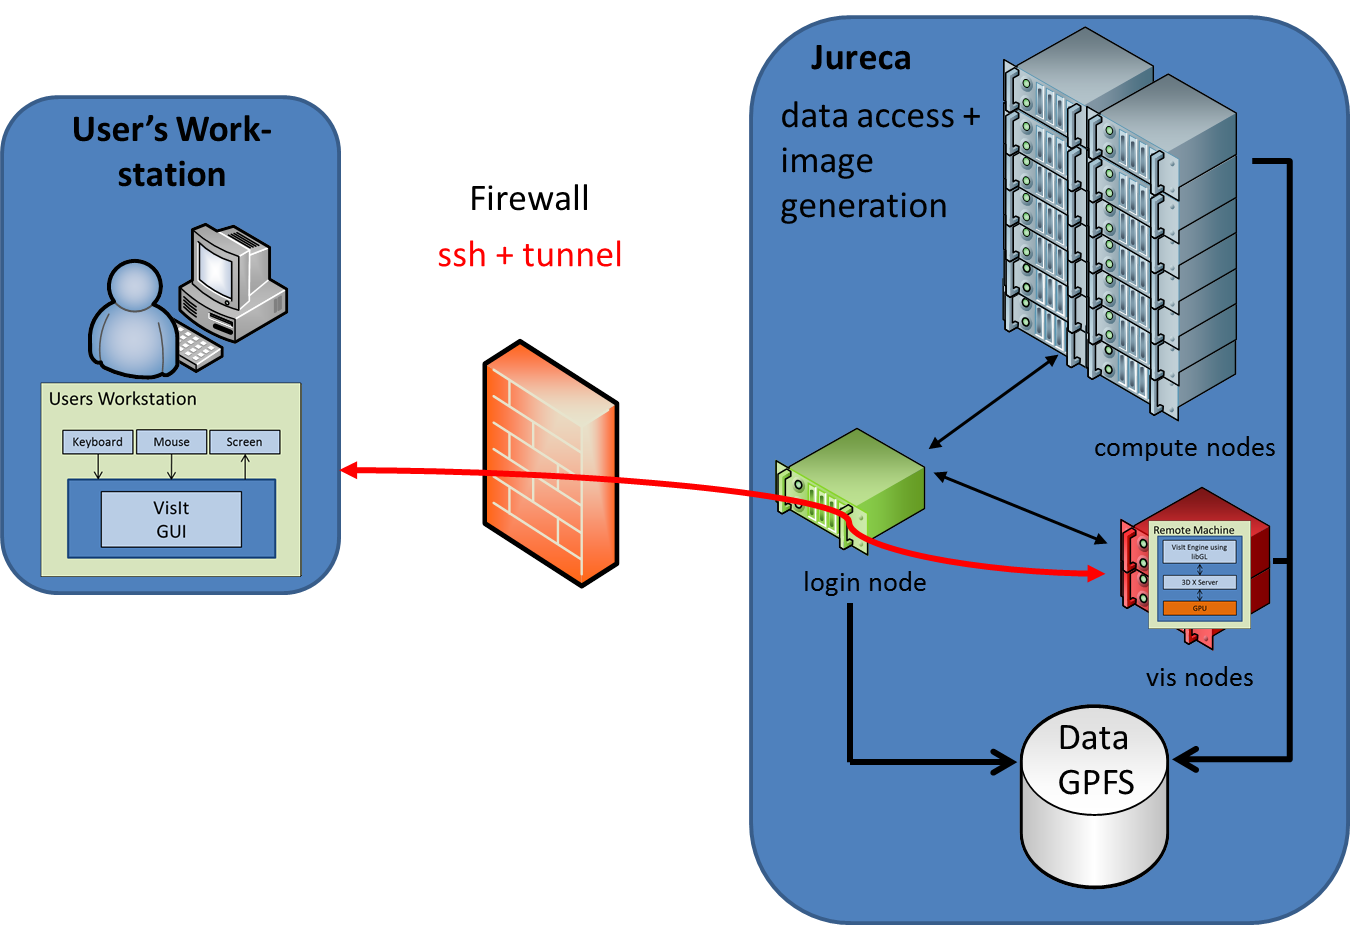
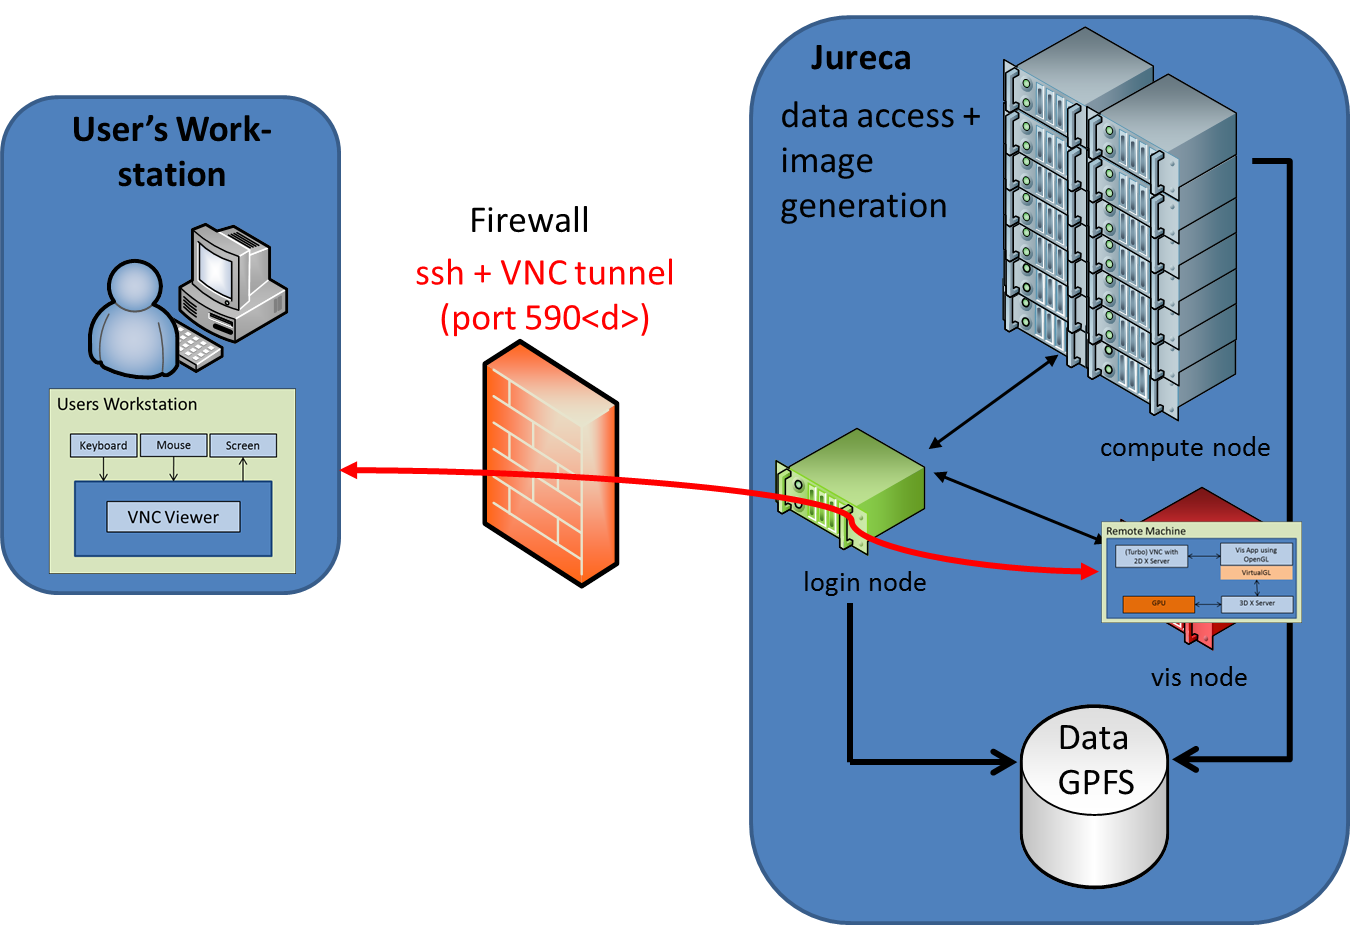
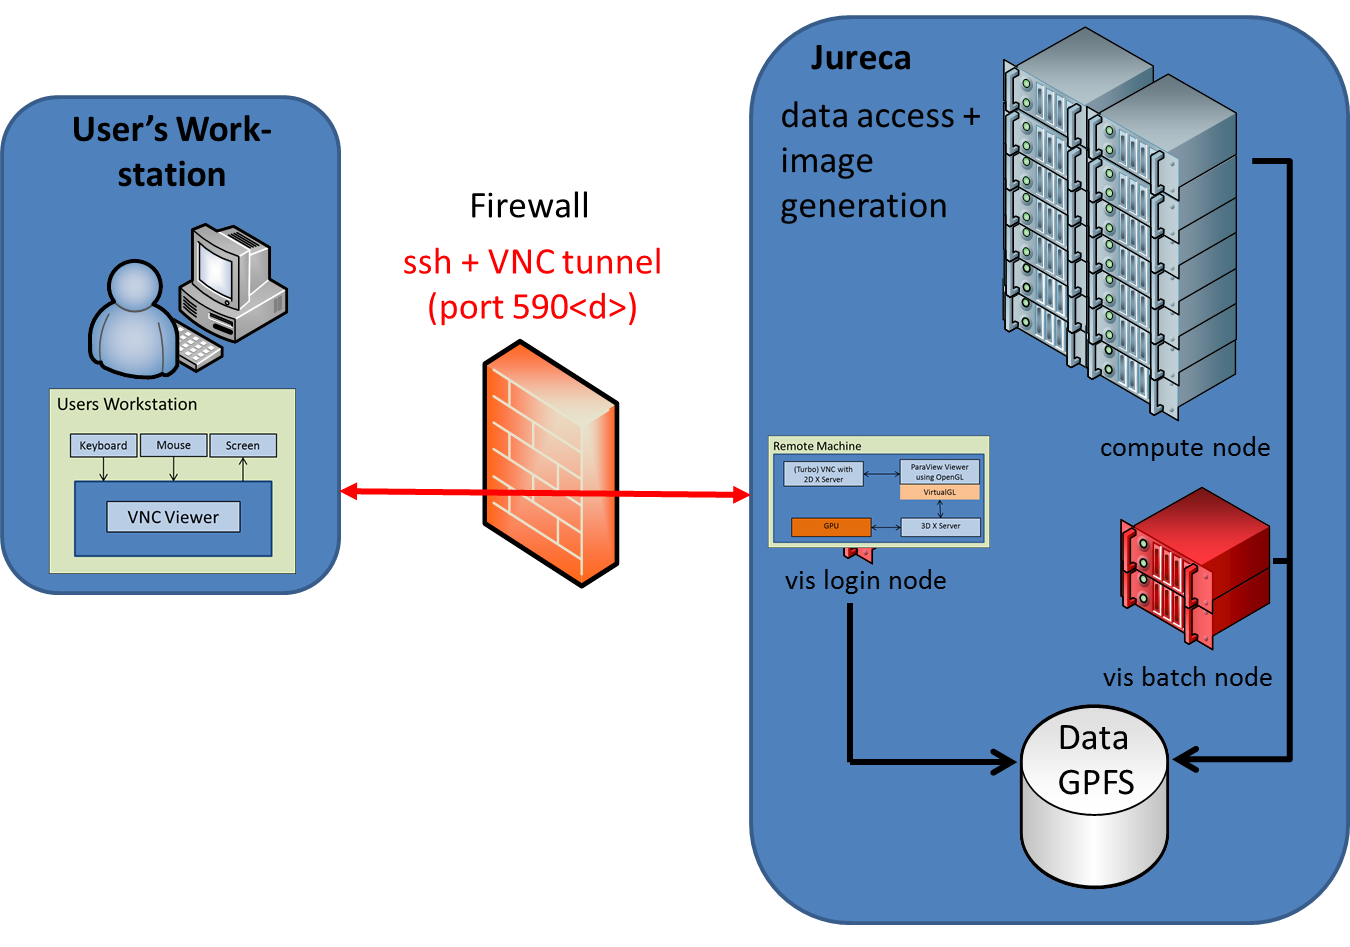
The following image illustrates the general JURECA hardware setup used in a distributed visualisation session.
The user workstation acts as a frontend to setup the visualisation pipeline and to interactively adjust parameters of the visualisation process. Of course also the rendered image is shown on the users workstation.
The right side illustrates the major components of the JURECA cluster: login, compute and visualisation nodes and the GPFS storage system (JUST), which holds the data to be visualised.
The user has access to the resources of JURECA only via an ssh connection to a login node. In between is a firewall which only allows access to the system by ssh (port 22). All other network ports are blocked. Therefore all communication related to the distributed visualisation environment has to be tunneled over ssh.

In general, a distributed visualisation package, like VisIt, consists of a viewer/GUI component and a parallel server/engine component.
These software components can be mapped onto the hardware components in different ways. The three most commenly used scenarios are discussed in the following sections.
Remote visualisation on a JURECA (vis node or compute node)
In this scenario only the VisIt viewer (GUI) is running on the users workstation. The data processing and image generation is performed by one or more VisIt engines (servers) running on one or more JURECA nodes, which can be nodes from the visualisation partition or from the compute (batch) partition.
Like the compute nodes also the vis nodes have to be allocated by the JURECA batch system. That means that this visualisation scenario may perhaps not start instantly if all free resources are already taken by other users!
In this case one has to wait for available nodes. At the moment, the reservation of vis nodes, which would guarantee the access to vis nodes at a certain point in time is not yet possible. This feature is under development and will be available in the future.
All network traffic (e.g. sending images from the VisIt server to the viewer) runs across the login node and has to be tunneled.
VisIt has a build in functionality to connect to the login node and to start the necessary batch job, so the user does not need to login manually to JURECA and start visualisation related batch jobs for VisIt by hand. Nevertheless VisIt uses ssh under the hood.
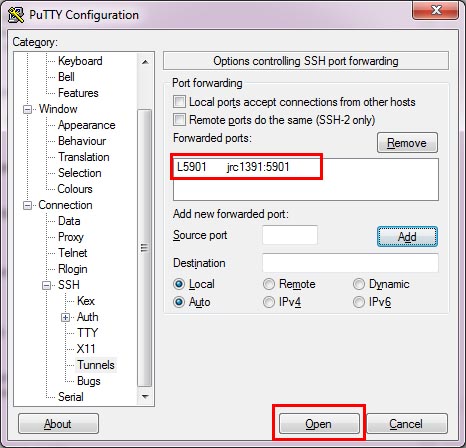
Therefore an important prerequesite to get this scenario running is a flawlessly working ssh connectivity between the users workstation and JURECA! If a Windows operating system is used, it may be necessary to use an ssh key agent like Pageant, which is a part of the PuTTY ssh client for Windows.
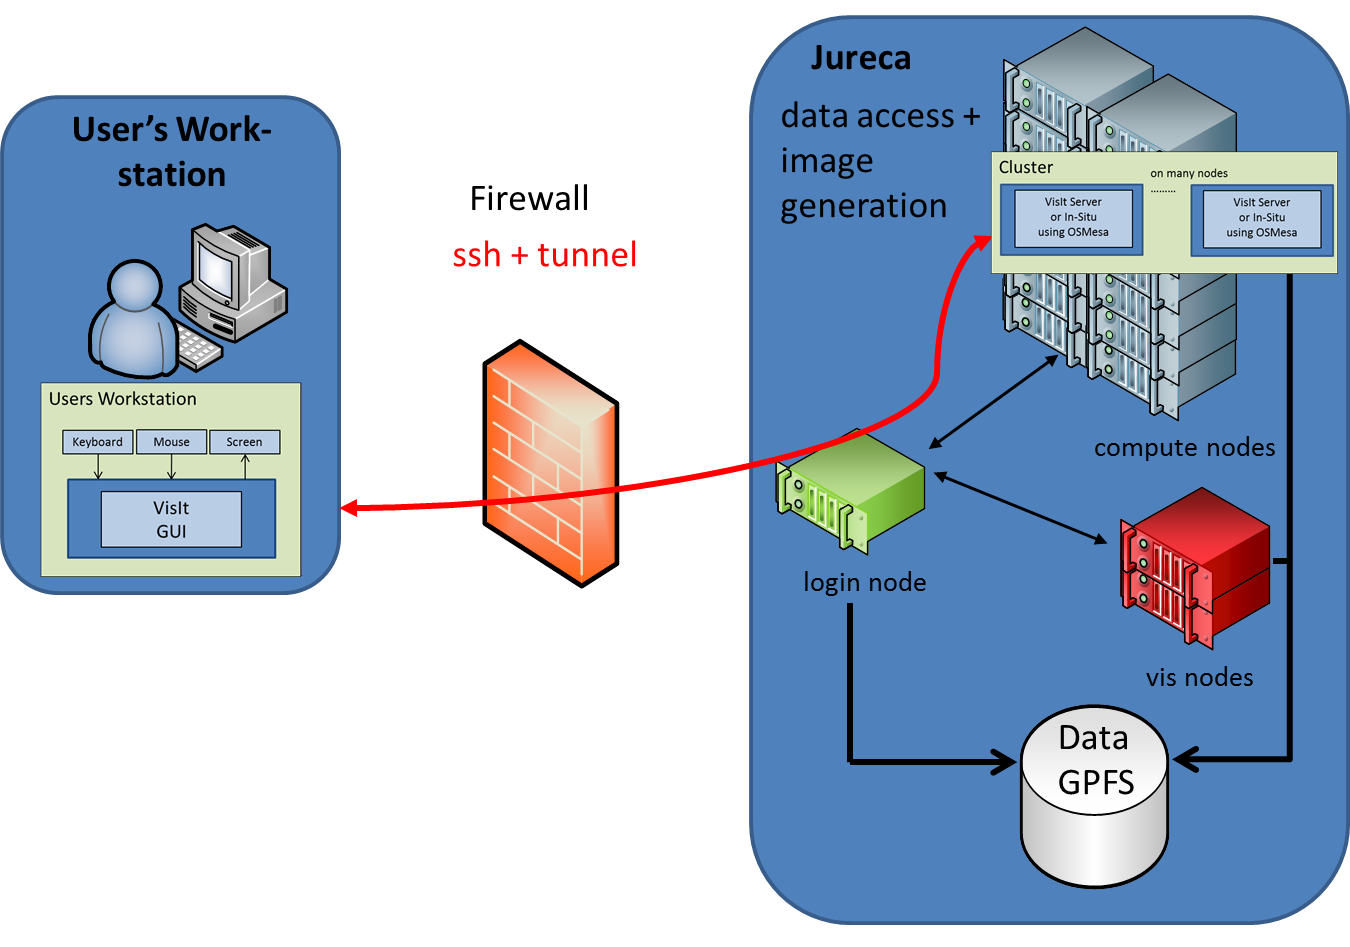
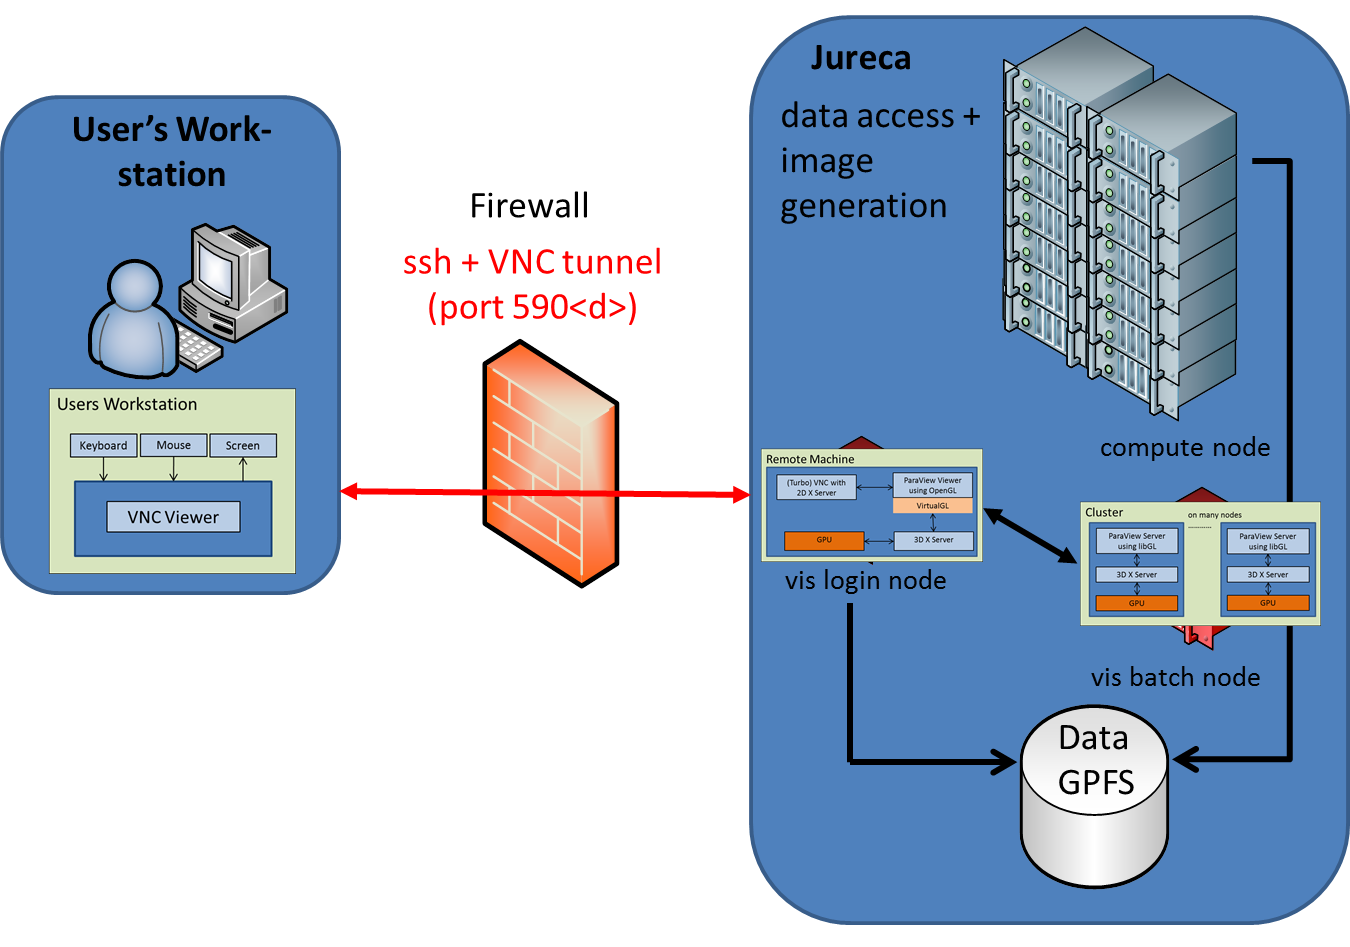
Using vis nodes
JURECA is equipped with 12 vis nodes. 10 of them have 512GByte main memory, 2 have 1024GByte main memory. Two NVidia K40 GPU's are attached to each vis node. For visualisation purposes only one GPU can be used at the moment. Whenever a batch job is startet via "sbatch --gres gpu:2 --start-xserver", an X-Server :0.0 is startet on the vis node to enable the usage of hardware accelerated OpenGL rendering (these options are already included in the here provided host profile, see below). The following figure gives an overview about this setup.

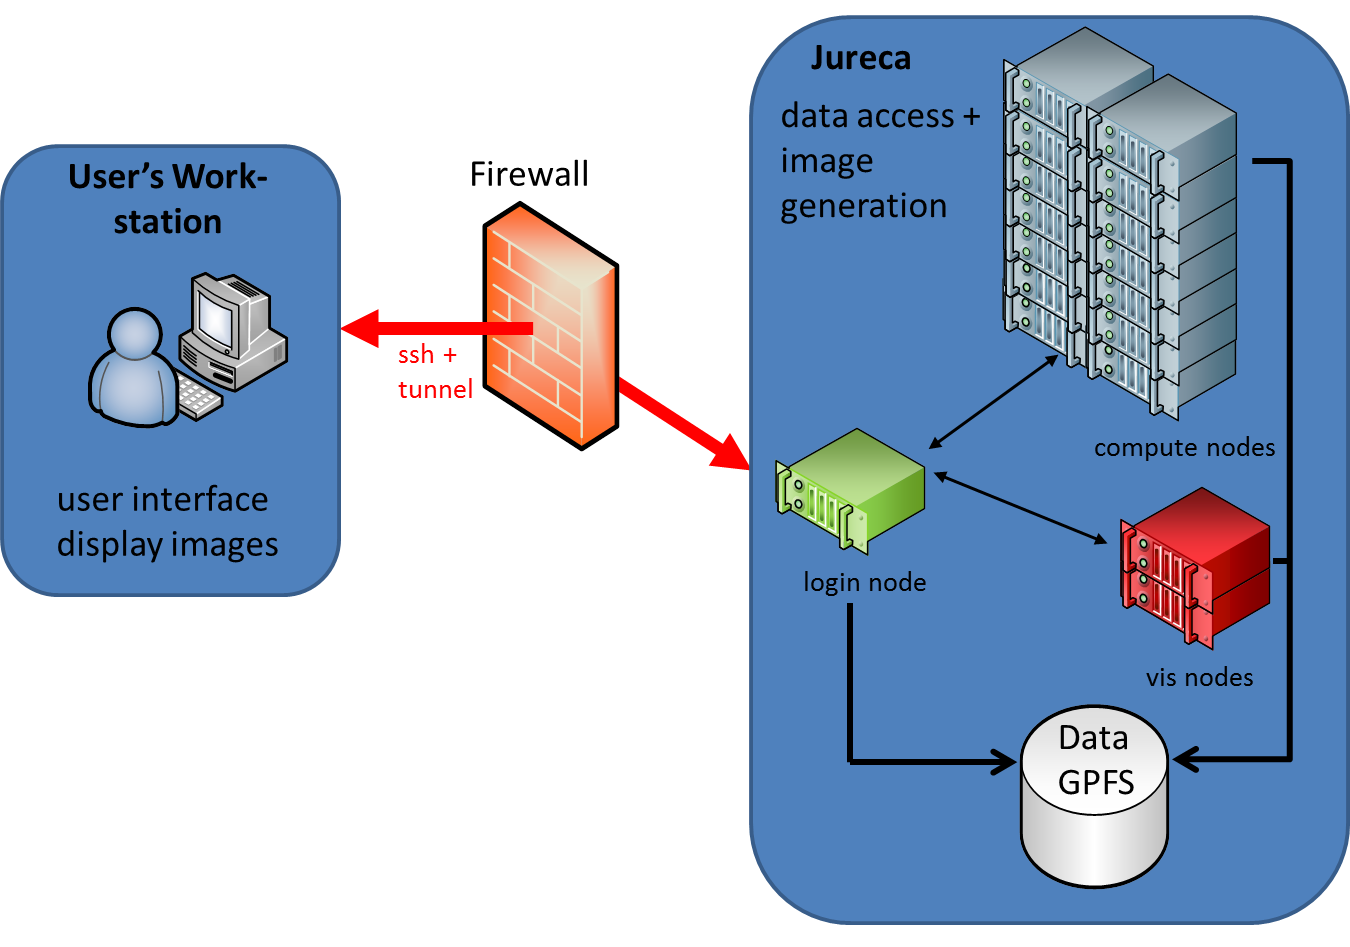
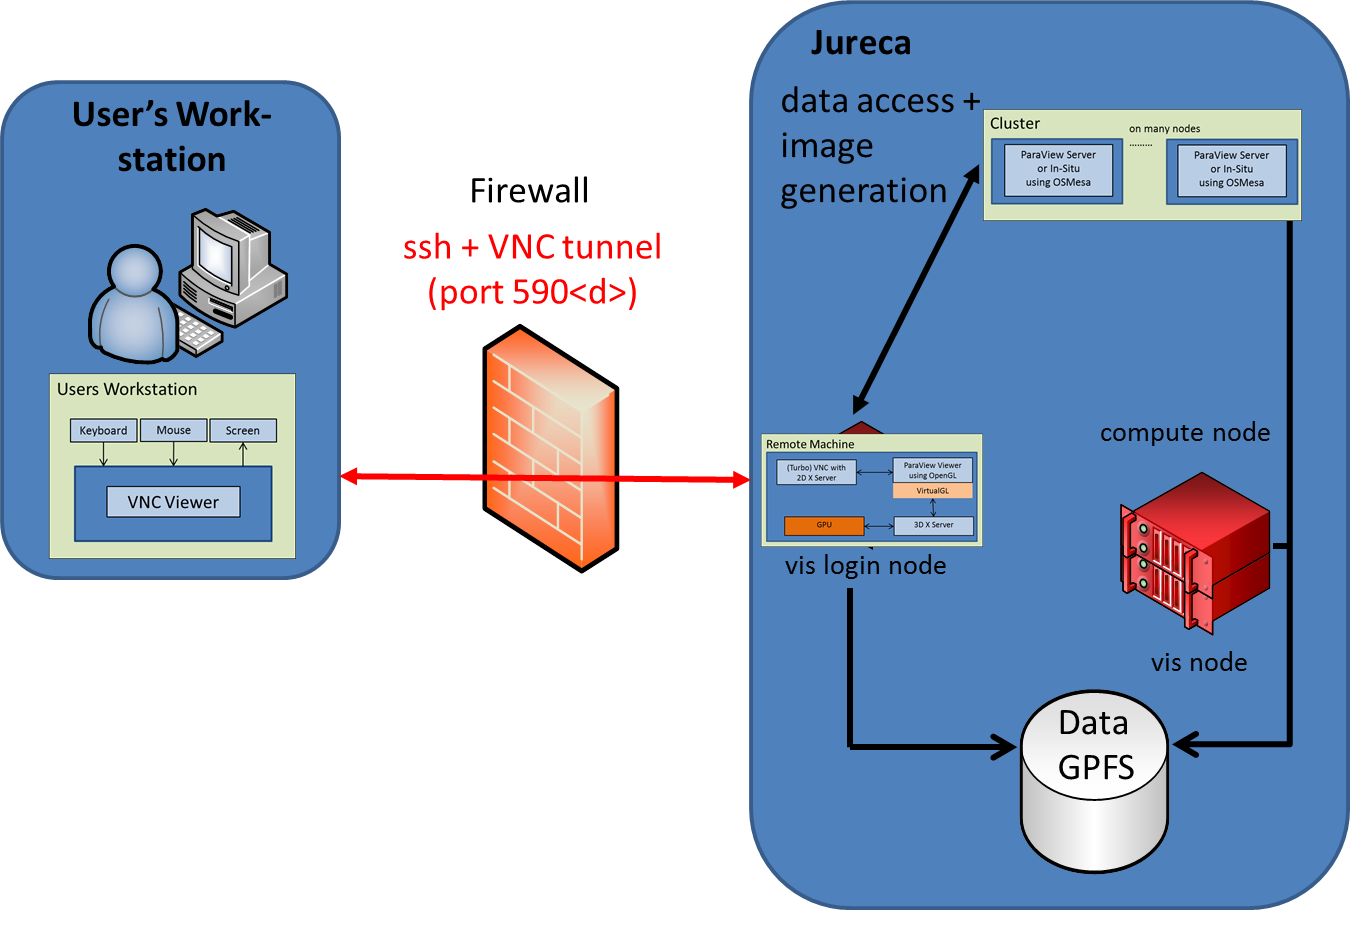
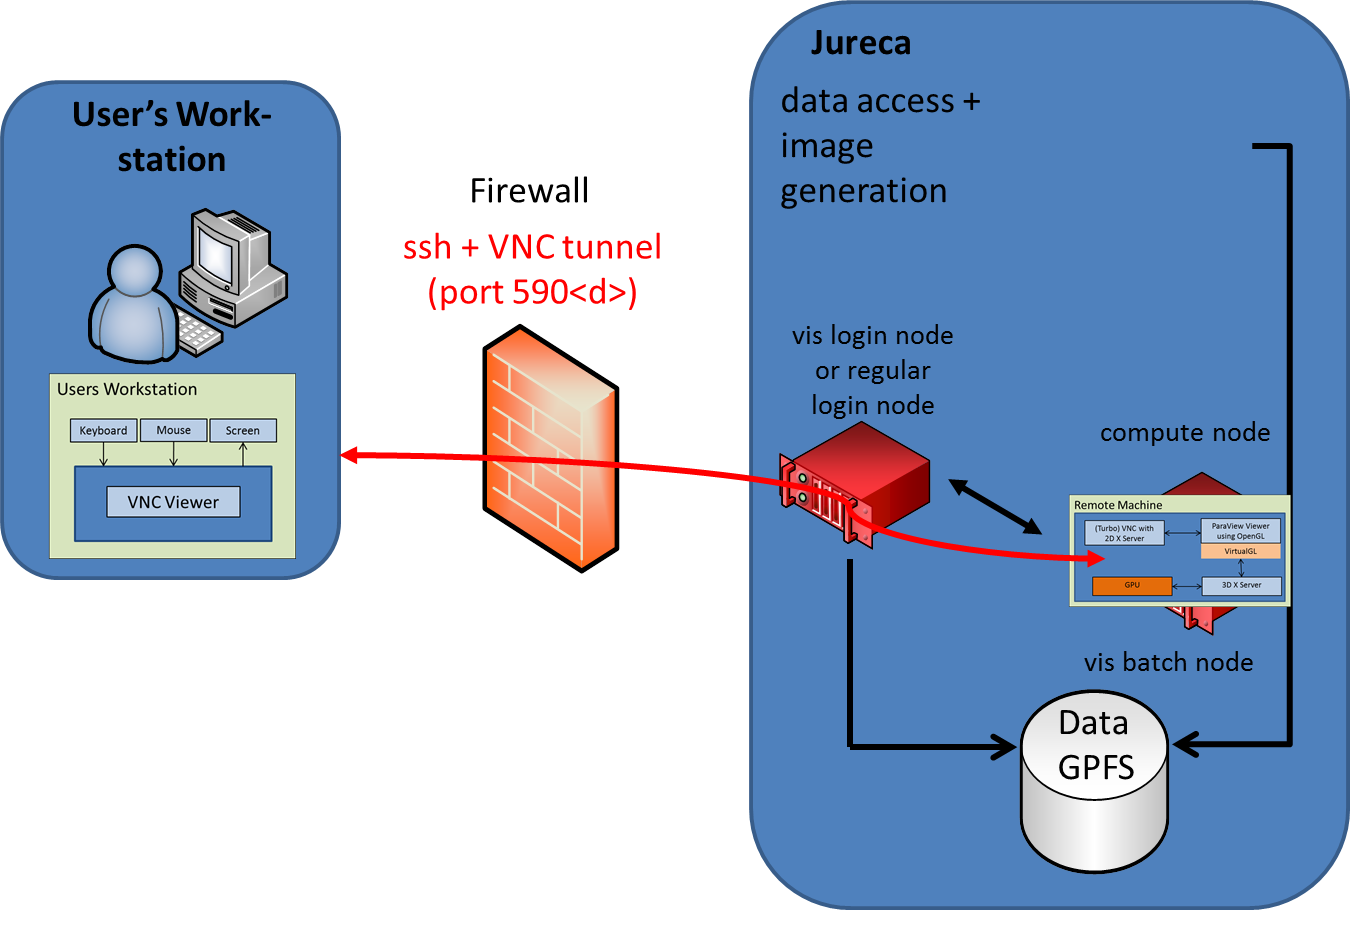
Using compute nodes
Although on compute nodes only software rendering (via OSMesa) is possible, it can make sense to use compute nodes for remote rendering for some reasons:
- huge number of nodes can be used, e.g. to improve I/O or data processing speed (image rendering is not always the bottleneck)
- in case that all vis nodes are occupied, using compute nodes could be a workaround
- in-situ visualisation of a running simulation (not covered in this section)
The following figure gives an overview about this setup.

In detail the following steps have to be performed:
1. Check ssh connectivity
Make sure that your workstation has flawless ssh connectivity to the login nodes of JURECA. On a Linux workstation just check that you can login to JURECA with the regular ssh command.
On a Windows system you may need to install an ssh client first, e.g. PuTTY, together with the ssh key agent Pageant. Maybe you also want to install PuTTYgen to generate new ssh keys.
Start Pageant and load your private ssh key into Pageant. Pageant will ask you for your passphrase, which unlocks the private key. Now VisIt will be able to connect to JURECA using the (unlocked) private key stored in Pageant.
2. Install (the correct version of) VisIt on your local workstation
If not already done, download VisIt and install it on your workstation. Your local VisIt version must match the version installed on JURECA, which, as of today, is 2.10. So you have to install exactly VisIt 2.10 to get the setup running.
3. Create/import a host configuration for JURECA
To work in a distributed setup, VisIt needs information about the remote cluster and about how to launch processes on this cluster. These settings are collected in a so called "Host profile" and can be adjusted in VisIt under Options --> Host profiles.
To keep things simple, we have created a predefined host profile for JURECA, which can be downloaded here.
Just download this file and, depending on your operating system, copy it on your local machine to:
- on a Linux system: ~/.visit/hosts
- on a Windows system: C:\Users\<username>\Documents\VisIt\hosts
After the successful installation of this file, start VisIt and open the host profile panel. You should find a host profile for JURECA now. The host profile has two launch profiles, one for launching the VisIt server on a vis node and another one for launching VisIt on compute nodes.
4. Connect VisIt to a JURECA login node
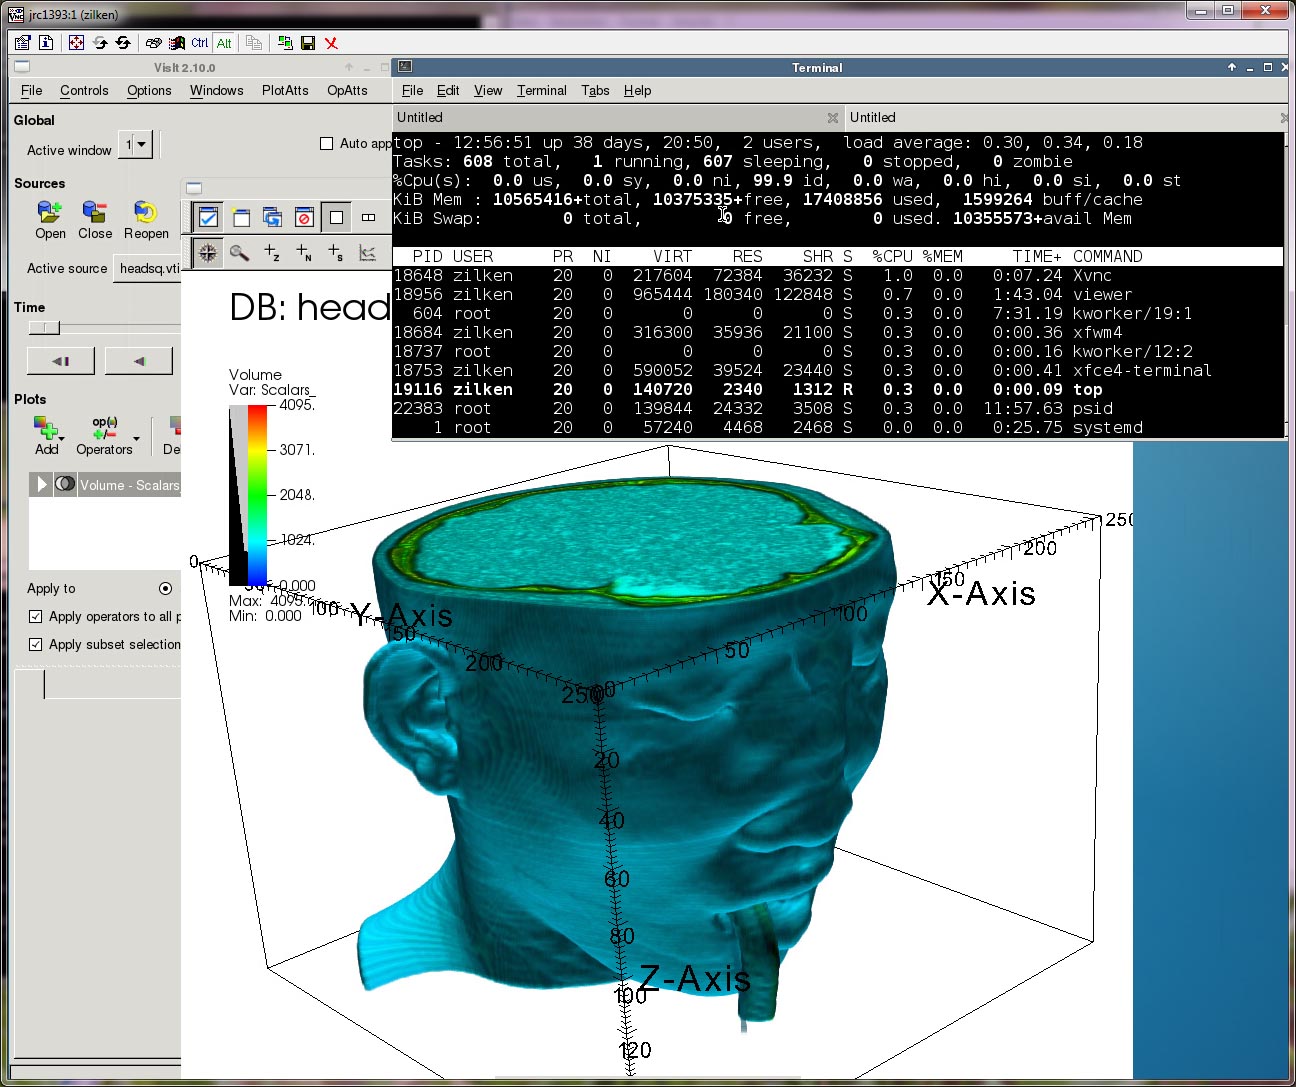
Start VisIt locally and click on "open file". A file browser pops up. Select JURECA as host. Now VisIt tries to establishes an ssh connection to JURECA and to start some VisIt components (mdserver, vcl) on the login node. This process may take some seconds, so be patient. If everything works fine, the filesystem of JURECA is displayed in the filebrowser now. Select the data file you want to visualise and click on "OK".
5. Start VisIt server (engine_par) on the batch system
After the file is selected, VisIt opens a panel where you can select one of the two launch profiles (vis node or compute node).
You also can adjust the number of requested nodes and the (total) number of mpi processes here. As JURECA offers 24 cores per node, the maximum number of mpi processes is 24*number_of_nodes. However, as many visualisation algorithms do not scale very well, you may want to spawn fewer processes than the maximal number. You should experiment with these values to find out a good solution for your specific data and visualisation setup.
Select a launch profile and click on "OK". Now VisIt creates a temporary batch script on the JURECA login node (under /tmp) and starts this script with the batch system. Depending on your selection of the launch profile, this batch job is either executed on the vis partition (sbatch --partition=vis) or the batch partition (sbatch --partition=batch).
The launch of the batch job may take a while, so be patient, and remember that the job can only be started if there are free resources on the cluster.
Attachments (14)
- Cluster_VisIt_3D.png (211.6 KB ) - added by 8 years ago.
- Cluster_VisIt_2D.png (193.8 KB ) - added by 8 years ago.
-
Hardware_Setup.png
(203.0 KB
) - added by 8 years ago.
JURECA hardware setup
- putty2.jpg (72.3 KB ) - added by 8 years ago.
- putty3.jpg (72.8 KB ) - added by 8 years ago.
- remote_desktop.jpg (279.9 KB ) - added by 8 years ago.
- Trac_Setup_VNC.png (211.9 KB ) - added by 8 years ago.
- vis_login_compute_parallel.png (141.4 KB ) - added by 8 years ago.
- vis_login_node.png (213.9 KB ) - added by 8 years ago.
- vis_login_vis_parallel.png (211.5 KB ) - added by 8 years ago.
- vis_batch_node.png (124.8 KB ) - added by 8 years ago.
- host_jureca.2.xml (12.8 KB ) - added by 8 years ago.
-
host_jureca.xml
(12.8 KB
) - added by 8 years ago.
JURECA hostprofile
- host_jureca_vis_batch_node.xml (3.6 KB ) - added by 8 years ago.
Download all attachments as: .zip