| Version 16 (modified by , 8 years ago) ( diff ) |
|---|
Graphical Login (VNC)
Remote visualization, either implemented within visualization applications themselves or through server software,
eliminates the need for off-site file transfers and allows HPC users to run a broad range of visualization tools
in-place on the supercomputer where the data resides and more compute resources are available.
A graphical login using Virtual Network Computing (VNC) simplifies the access to remote visualization.
A broad variety of Linux applications with graphical user interface and/or need for OpenGL can be used directly on the supercomputers via VNC.
VNC provides a complete graphical and remote desktop by
- transmitting the keyboard and mouse events from your computer to the remote machine and
- relaying the graphical screen updates back in the other direction.
VNC is
- platform-independent (VNC viewers are available for almost any operating system)
- application-independent (no need for remote visualization support inside the application)
- multiple clients may connect to a VNC server at the same time sharing the same session (support, presentation, group discussions)
VNC software used at the JSC:
... using VNC
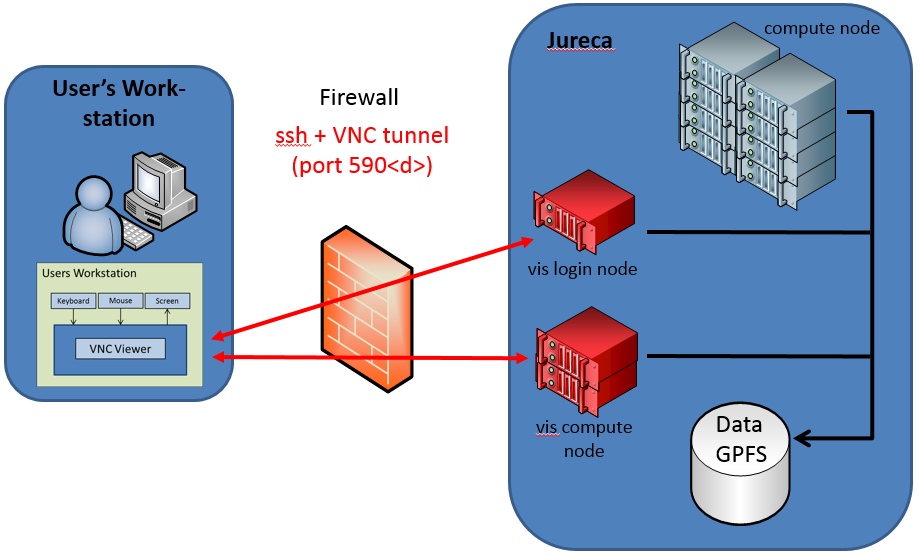
VNC follows a very general approach, where a remote graphical desktop on one node of the remote cluster is started.
On the user's workstation only a lightweight VNC viewer has to be installed.
The graphical screen of the remote desktop is send as an image from the cluster to the viewer on the fly.
The user can work with this remote graphical desktop in the usual way, just by interacting with keyboard and mouse.
This is a very convenient way to work on a remote machine, not only for data visualization.
hardware accelerated rendering (OpenGL)
 Whenever an OpenGL capable visualization software, like VisIt, is started on the remote cluster node,
OpenGL commands can be redirected to the GPU of this node with the help of VirtualGL (using the command 'vglrun').
This way the hardware accelerated rendering capabilities of a cluster node (if available) can be exploit for remote rendering.
(attention: without VirtualGL software, rendering using the CPU instead of the GPU must be used (if available), which is much slower).

The following steps are necessary to start a VNC session for remote rendering with VisIt on JURECA. Please notice that the VNC server is only available on vis-nodes!
Prerequisite: Create a VNC password and a startup script on JURECA
This step is a prerequisite for using VNC and has only to be done once.
The aim of this step is to create a VNC password and a very small (one line) VNC startup script to start the Xfce desktop environment. As all VNC related commands are only available on a vis-node, one has to allocate a vis-node first and then start an interactive shell and execute the necessary commands there. It works as follows:
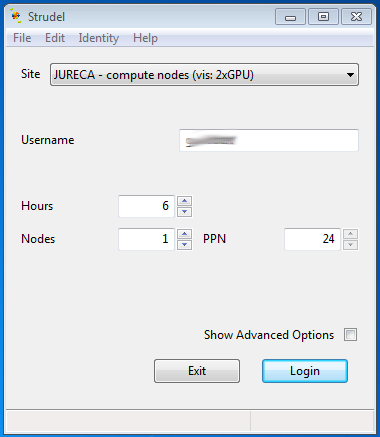
1. Start VNC server on a vis node
Open an ssh shell on a login node of JURECA the usual way.
To allocate a vis node with 512 GByte main memory for one hour, use:
Alternatively you may want to allocate a vis node with 1024 GByte main memory by:
The default wallclock time is 1 hour, the maximum is 24 hours.
In case the VNC server could successfully be started, you will get an output like:
As you have to setup an ssh tunnel (with the correct network port) to the allocated node in step 2,
two important informations have to be taken from this output:
- The allocated node is jrc1391
- The number of the VNC display is :1
It is very important to know that the network port of the VNC server depends on this display number.
The actual port number is 5900+<VNC display>, therefore port 5901 must be tunneled in this case.
2. Tunnel VNC traffic to workstation
Now you have to open an ssh tunnel from your workstation to this node.
The steps to be done depend strongly on your operating system and your setup.
Linux:
If your operating system is Linux, just use:
Windows:
In case your operating system is Windows, the setup of the tunnel depends on your ssh client.
Here a short overview on how-to setup a tunnel with PuTTY is given.
It is assumed that PuTTY is already configured in a way that a general ssh connection to JURECA is possible.
That means that host name, user name and the private ssh key (using PuTTY's Pageant) are correctly set.
To establish the ssh tunnel, enter the "SSH-->tunnels" tab in the PuTTY configuration window.
You have to enter the source port (in this case 5901) and the destination (in this case jrc1391:5901) and than press add.
After pressing add, the tunnel should appear in the list of forwarded ports and you can establish the tunnel by pressing the open button:

3. Connect to the VNC server
If you are using Linux, a vncviewer typically is already part of the distribution or can be installed from a repository.
For Windows, a VNC viewer can be downloaded for example here.
Start your local VNC client and connect to localhost:1, e.g.:
After typing in your VNC password, you will have access to the remote graphical desktop running on the visualization node of JURECA.
any feedback welcomed - h.zilken@…, j.goebbert@…
Attachments (9)
- strudel_icon.png (27.8 KB ) - added by 8 years ago.
- manual_icon.png (4.9 KB ) - added by 8 years ago.
- Trac_Setup_VNC.png (105.3 KB ) - added by 8 years ago.
- screenshot_vnc.png (151.2 KB ) - added by 8 years ago.
- xpra-logo.png (6.5 KB ) - added by 7 years ago.
- virtualgl_vertical_small.png (10.2 KB ) - added by 7 years ago.
- Strudel_GUI.png (17.7 KB ) - added by 7 years ago.
- Xpra_GUI.png (21.8 KB ) - added by 7 years ago.
- virtualgl.gif (19.0 KB ) - added by 6 years ago.
Download all attachments as: .zip